Coach Dan Bell

Rubber City Weightlifting

Let’s Meet at the Bar

No, not this bar . . .

Image

This one:

Image

I was reading a recent post on the Pendlay Forum about whether to meet power cleans high or low, which led to a back-and-forth on whether to teach beginners powers first or begin with full lifts. There was discussion of whether beginners should even do power versions of the lifts. I think the original premise is flawed. I don’t teach new lifters to do full lifts or powers; I teach them to pull to the bar. The weight on the bar will determine if it’s a power or full lift.

I teach lifters to meet the bar where it is, not where they want it to be or where they prefer to go or the position they hit out of habit. I’ve talked before about the arms being active throughout the lift, sweeping the bar straight-armed all the way to the top of the pull and then actively pulling against the bar as the feet leave the platform. In this moment–feet off the platform and arms pulling hard against the bar–the lifter must pull their body to the bar. In the snatch, the lifter pulls the fists all the way to the lockout position, in the clean, the lifter pulls the bar right to the collar bone. Properly timed off of the first pull, the combined actions of the arms and feet will have the lifter meeting the bar at or near the apex of its upward trajectory.

Image

If the bar is light, say 70% or 80%, the lifter will meet the bar and tighten against it for a power. If it is heavy–90% or more–they will meet it lower, in a full version of the lift.

I think this is the essence of the band drill that Glenn Pendlay talked me into trying with my lifters. Yes, it does teach lifters to pull into the hole, but I like the way it forces them to pull quickly to the bar and tighten against it. In the snatch version, the only way to do that against the downward “suck” of the bands is to pull and punch against the bar in one fluid and continuous motion. The drill makes you pull to the bar. If you just jump to the bottom to “catch” the bar, it crashes on you.

So don’t think of intentionally powering the weight or doing a full lift, think of pulling to the bar. If you want to do powers, put less weight on the bar. If you want to do full lifts, put more weight on the bar. If you want to grab a beer after the workout, yeah, we can go to that other bar.

Dan

coachdanbell.com


Pilgrimage

No coach is good at everything. We all have more to learn. For a decent coach to become good, and a good coach to become great, you have to set aside your ego and be willing to learn continuously, from whoever has something valuable to teach. Especially since starting up my own club again (Rubber City Weightlifting, Akron, Ohio) I’ve been trying to learn from a couple of proven coaches I’ve come to trust: Don McCauley and Glenn Pendlay. So after giving Don and Glenn fair warning, I loaded my car with lifters (Jon Dawson, national qualifier at 85kg and Phil Martter, future +105 hiding in a heavy 94’s body) and headed off Friday morning to Savannah to visit Don.

Don

Coach Don McCauley manages to look skeptical and happy at the same time.

We met Don at CrossFit Savannah, where he coaches with his wife Suzanne, and followed Don to their house. (I should note that following Don’s driving is a difficult task under any circumstances, but doing it through Savannah is hazardous to your health. We passed at least three accidents on the way and just dodged a couple ourselves) Don and his wife Suzanne could not have been better hosts. We each had our own beds–and our own cat–waiting for us. We spent the evening knocking back a couple good microbrews and bullshitting about weightlifting. Only dinner with Hemingway could have beaten that.

Saturday Don and I did a mini-clinic on technique at CF Savannah while Jon and Phil trained. We only had three people show for the clinic, but they were good athletes and learned fast. I think several PRs were hit, which you’d expect with a coach to athlete ratio of 2:3. They left happy, anyway.

Don spent some time helping Jon and Phil through their second workout of the day while I sat back and watched. Don is a huge proponent of “touch cues.” I’m a fairly articulate guy and use mostly verbal cues. I get frustrated when they don’t work well or at all, and I wanted to see how and where Don implemented his tactile cues.

After another evening of good beer and more weightlifting talk, we once again followed Don on the four hour drive up to Muscle Driver USA, just outside Charlotte, in Fort Mill, South Carolina. We got there in time for the morning workout. Glenn was kind enough to open up a platform for Jon and Phil to train alongside the rest of the MDUSA crew. The morning training session is not normally heavy, and usually serves as more of a setup of the afternoon workout. I had the guys snatch and Don helped out Jon with one of his more unconventional cues. It seemed to work as Jon’s pull was markedly improved and he finally felt like he got all of his “legs into the lift.”

Image

“The Beard”  Coach Glenn Pendlay

Glenn’s coaching style is the polar opposite of Don’s. Don is constantly patrolling, going from platform to platform watching, making corrections where he sees the need, or spending a while with a lifter who has particular trouble that day. Glenn sits back and watches. He wants to see if the problem he sees is an anomaly or a consistent problem. For the most part Glenn likes to fix technique problems within the context of the program, with complexes that address the problem, fixing it more with focused reps than with many verbal or tactile cues. The combination of Glenn and Don’s styles seems to be sitting well with the lifters at MDUSA, as PRs and huge lifts are as common as dirt at the MDUSA gym.

Between the atmosphere and Don’s help with his jerk, Jon hit a 5kg PR 155kg in the Clean & Jerk in the afternoon workout. I missed it, of course, and got no end of shit for that from Don, Glenn, Phil and Jon.

At the end of the afternoon session we all went back to Glenn’s house. We were greeted by Glenn’s giant-headed rescue pit bull, whose tongue, I can confirm from up close experience, is as wide as a human face. Glenn fed all of us, and food at his house is every bit as good as it looks in his blog posts.

After dinner and more bullshitting about weightlifting (is there a theme here?) Travis Cooper, Glenn’s tech guy and Pan Am Team member, set us up for a podcast, where I took some more shit for missing Jon’s PR C&J.

All of us Rubber City guys had a blast, truly a great road trip, but it was much more than fun. I not only learn from trips like this, but I hope I bring something as well. Don pointed out early on that Jon had the bar too close to his shins in his starting position. I pointed out in the clinic that Don hadn’t shown one of the attendees how to tighten his upper back. I spend so much time with beginners that I skip over some important nuances of the lifts because beginners can’t use them yet. Don spends so much time with advanced lifters that he sometimes skips over small basics that he unconsciously assumes the lifter knows and does. We both developed “holes” in our coaching eyes out of habit. Trips like this serve as reminders and refreshers for everyone. This kind of informal coaching summit/visit/seminar is an essential part of the mentoring and developmental process for new coaches, too. It has been my experience that most high level coaches are very approachable and would love nothing more than to share what they know with other coaches. As a younger or newer coach, to not take advantage of that impulse and soak up all you can is to hold yourself back, but worse, to hold your lifters back.

Dan

coachdanbell.com

The Jerk is F@#%ing Hard!

Clean? Tough. Snatch? Tougher, for sure. But the jerk? Now we are now talking about the most difficult feat in weightlifting. I know, I know, snatches drive a lot of lifters, especially newer lifters, batty. But the split jerk is as technically demanding as the snatch, maybe more so, and comes after a heavy-ass clean. It requires as much attention as the snatch.

Getting a good rack position and then learning to dip and drive properly is hard enough. (Check the last couple posts below) Now comes the mind-fuck: arms punch up, at the same time punching the hips down, and the feet move in opposite directions, perpendicular to the movement of the body. How do we coordinate all that? One piece at a time.

Let’s start with the feet. First, we do not jump into a split and land both feet at the same time. I know some coaches teach it that way. I do not, and for a very good reason: most of the best jerkers in the world land their back foot first. I consider that vital to the way I teach the jerk. So start by drawing a tic-tac-toe grid on the floor in chalk. Make a mark at your heel, the tip of your toe and the inside edge of your foot. Draw lines through those marks and you’ll end up with this:

Image

The squiggle in the middle is the “no-go” zone. I tell clinic attendees it’s a rattlesnake, so don’t step on it. That keeps the lifter from “tight-roping” the split.

Now you’re going to move your back foot first, lightly dragging your toe or ball of the foot–yes, keeping it in contact with the floor. You’ll land the ball of your foot just behind the heel line, dropping your hips as straight down as you can manage while doing so, landing the foot with a tight ankle, heel off the floor. Then step off from that anchored back foot and punch the front foot heel in front of the toe line. The whole thing should look like this:

Jerk Footwork Drill

That’s Kat Lee doing the drill. She’s doing pretty well for someone who’s been lifting for about three months. I recommend that you do this drill for ten reps, ten times per day, wherever you happen to be. (I’ve done it while standing in line at the grocery store. Check for onlookers before proceeding to kill time like this. Someone may call in a mental health professional) Do this for ten days in a row and this foot movement will start to become natural. That’s important, because you don’t want to be thinking about it when you move.

Now, what to do with the arms. Remember that good rack position we looked at last time, with the elbows down but still slightly forward of the wrists:

Image

We want the elbows in front of the wrists to encourage punching up and back, to the back of your head or back edge of your ears. In the following photos of Alexi Yufkin, mid-jerk, you’ll see that very good jerkers maintain that elbows-in-front position throughout most of the arm action in the jerk:

Image

Image

Image

When you do this with the back foot anchored, pushing back on the bar drives your torso forward and down, under the bar:

Image

Here’s a couple more pics illustrating this anchored-back-foot, punching-up-and-back, torso-driven-forward-and-down movement:

Image


Image

In the photo above the lifter is picking up that front foot more than I’d like (keep it low and fast) but it’s a great illustration of the concept of getting the back foot down first.

I like to land the back foot first because the combined anchored back foot and fists-punching-back action puts the lifter in proper position under the bark automatically, rather than by an effort to “push the head through” that can lead to a forward lean and the bar too far behind the lifter. Punching to the back edge of the ears or back of the head emphasizes the drive of the hips and torso DOWN, not through, but still places the bar in the strongest position over the lifters shoulders.

Watch great split jerkers like Yufkin or Akkaev and you’ll see these principles in action. This is far from the last word on the jerk and I’m sure I’ll get a lot of questions. Fire away. Yeah, the jerk is f#$%ing hard. But when you hit a PR clean and nail the jerk, there are few better feelings in the world.

(Again, thanks to Nat Arem of Hookgrip for the use of his great photos)

Nice Rack

I still slip-up and yell that across a crowded CrossFit box during clinics sometimes. I can’t help myself. I get all tingly inside when I see a nice rack . . . position. (Did you really go there? Of course you did) Last time I talked about how I like a short dip in the jerk drive, the better to use the whip in the bar as it bends across the lifter at the bottom of the dip and jumps off at the top of the drive. But the bar needs a solid surface, a concrete column to wrap around, not a pile of pillows and bones.

Here is what I want you to look like just before you dip for the jerk:

Image

Image

So how do we get here? As you come out of the clean, the bar will probably be on top of your collar bone, your elbows up and pushing toward each other. You are at least trying to keep your chest up and the bar is probably on our fingers or even finger tips:

Image

Once you are standing, however, you cannot jerk the bar from here. For reasons we’ll get into in the next post, high elbows for the jerk does not work well. You need to keep the bar ON TOP OF YOUR COLLAR BONE, not in front of it or behind it. If you have to “pop” the bar up a little to reposition it, do so. (This takes practice and it best done coming right out of the clean, not after you’ve stood for a moment and let it settle where it is) You want the bar in the palms of your hands, not far down on the fingers. Now lift your sternum UP and push your shoulder joint (AC joint) FORWARD and DOWN, so that the bar is resting fully on your collar bone. Drop your elbows, but keep them in front of your wrists:

Image

Finally, your arms and hands should be relaxed. The full weight of the bar should be on your body, not in your hands at all. Your hands are closed on the bar but relaxed, and your arms need to be relaxed for the arm action that will follow.

I should mention that in pushing your AC joint down and forward, you are engaging your pecs and lats, tightening them. Lifting your sternum engages your upper spinal erectors. You’ve turned your upper body into a solid base upon which the bar rests in this position, and around which the bar will bend at the bottom of your dip. Again, make yourself look like Phil, one of our Rubber City lifters:

Image

One more thing . . . A common mistake when beginners are learning this position is to lift the AC joint up, taking pressure off of the collar bone. Do not do this. I know the position is uncomfortable at first and may bruise your collar bone. Take the pain for a week or two. It will pass. If you lift your AC joint up, it will mush down at the bottom or your dip and act like a shock absorber, taking most of the whip out of the bar.

Okay, get out there and make a rack I’ll be happy to see when we meet in person. You do want me to yell “Nice rack!” across the gym to you, don’t you?

PR Clean? No Jerk = No Lift

Far too many lifters walk away from a PR clean shaking their heads because they missed the jerk. They know deep in their hearts that until the jerk is dropped from weightlifting competition, they haven’t done anything to brag about. The jerk gives a lot of lifters fits for good reason: it is every bit as technically demanding as the snatch, but the technique of the jerk is usually given much less attention. I’ll try to fix that in the next couple posts.

Let’s start with the jerk drive. You probably know most of the standard cues for the dip and drive: bar set deep, behind your front delts, on your collar bone; chest up; weight on your heels; elbows down; etc. The goal is to get the bar to move straight down and drive straight up, or, ideally, back a little bit. A detail too often missed that I’d like to address is the depth of the dip and its effect on the drive. But a little digression is in order, first.

The quality of weightlifting bars is sometimes a hot topic of discussion among lifters and coaches. Experienced lifters know the feel of good “whip” in a bar. They can feel it coming out of a clean or the bottom of an ass-to-grass squat. Very good lifters can tell in the clean, how the sudden acceleration of the center of the bar at the top of the pull causes the bar to “jump” up the front of the body. There is good reason that people like Glenn Pendlay put so much thought and research into getting the whip of the bar just right. (Pendlay bars) But using those elite bars properly in the jerk is an art not often taught.

So how in the hell does this relate to the depth of the dip in the jerk? Stay with me. There are two ways of thinking of the jerk: you can launch the weight up or let the bar react off of you. I prefer the second. I can tell when a lifter is trying to do the first. They either think a deeper dip will help them get more legs in the jerk drive or instinctively dip deeper when they are trying to get more drive on the bar. There are a  few ways this can hurt you. First is the deteriorating mechanical leverage you have as you dip. The more acute the joint angle at the knee and hip, the weaker you become. The deeper you dip, the more acute these angles become. That makes it harder to turn the bar around fast at the bottom of the dip, which equals slow turnaround. And as we all know, slow is bad. Second, the deeper you dip, the greater the tendency to let the hips slide forward and get the weight too far to the front of the foot. The bar drops forward and down, then goes more forward and up, the bar path looking much like a check-mark. Finally, and I think most important, the slow, weak turnaround at the bottom of such a dip does not allow you to get the proper bar reaction, thus destroying the timing going under the bar. The lifter is forced to drive up too long and drive down under the bar too late.

Here is a still taken from a familiar Youtube video of Alexi Yufkin. He takes a short dip, gets good bar reaction and nails the jerk:

Image

(Here’s the original video)

The short dip allows him to stop suddenly and instantly turn around the center of the bar, the bar bending around his shoulders and jumping off of him as it straightens out. This enables him to finish his jerk drive nearly flat-footed and begin driving under the bar. He does not waste time adding more upward drive to the bar because it has used his body as a base to react against and launch itself off of him. I consider this perfect timing.

Here is another still from the man I consider to be the best jerker in the world, Khadzhimurat Akkaev, at the bottom of his jerk dip:

Image

(Original video)

The bar is wrapping around Akkaev as if dropped on top of a concrete column. His short dip allows him to hold a strong position at the bottom of the dip, keeping the bar over the middle to back half of his base.

As in the snatch or clean pull, the jerk drive is finished when the hips are finished. That means no driving high onto the balls of the feet before you begin driving your body down. In the still below, from the same video of Yufkin, you can see his right leg is blurred. That is because it is beginning to move backward. Notice that his left heel is barely off the floor, if at all. He has finished the jerk drive and is transitioning DOWN.

Image

Same thing below. Akkaeve is done driving the bar and his left foot is blurred, beginning to move backward. His hips are done driving and he is transitioning DOWN, but his heels are barely off the floor.

Image

So, a short dip that uses the whip of the bar to launch it off of your shoulders, a short drive that ends when the hip is finished and rapid transition under the bar. If you get the jerk dip and drive right, the rest of the jerk is a lot easier to master. And as long as Pendlay and Eleiko and Usaka, et al are going to put so much work into making elite level bars, a smart lifter will use that to his or her advantage. And last I checked, no one uses $70 bars at national and international meets–not unless they want 200+ muscled-up men and women chasing them through the streets.


Where the Jump Cue Takes You Off a Cliff

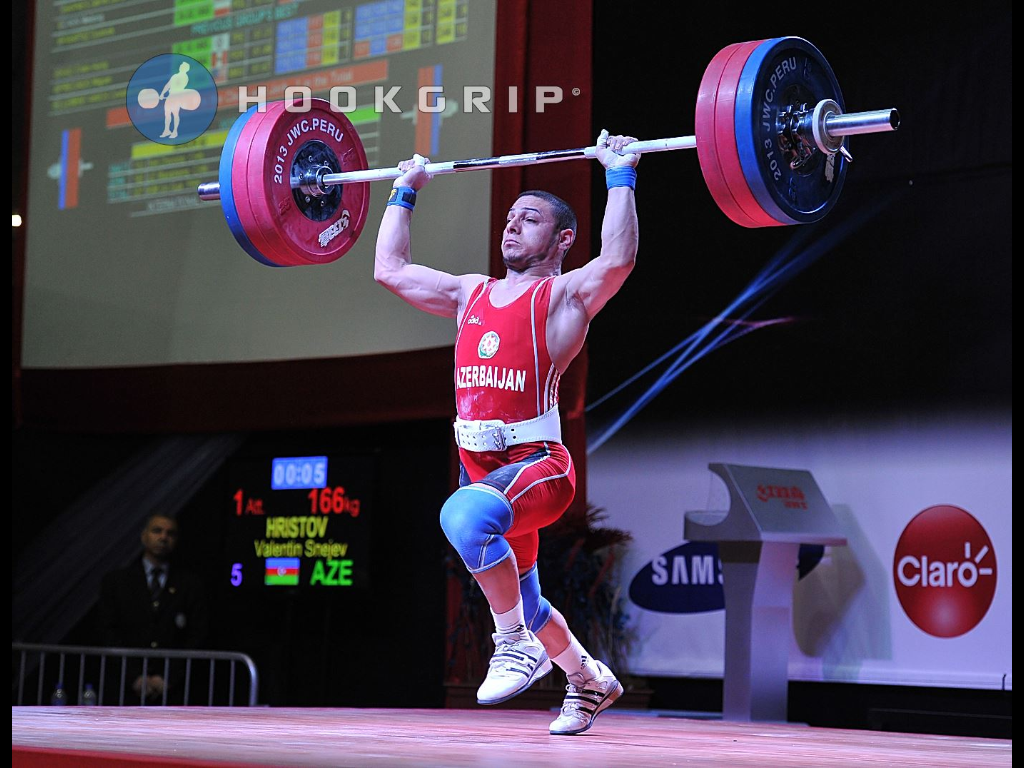
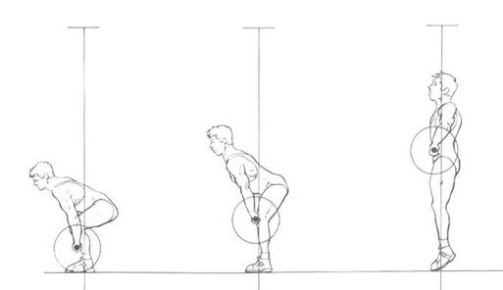
If you can’t see the problem, there won’t be a problem. Some nuances of technique are difficult to detect if you aren’t looking for them, but they can make a huge difference in how much weight ends up over your head. One important nuance is when and how to open the torso, and this is where the “jump” cue can cause havoc.

Image

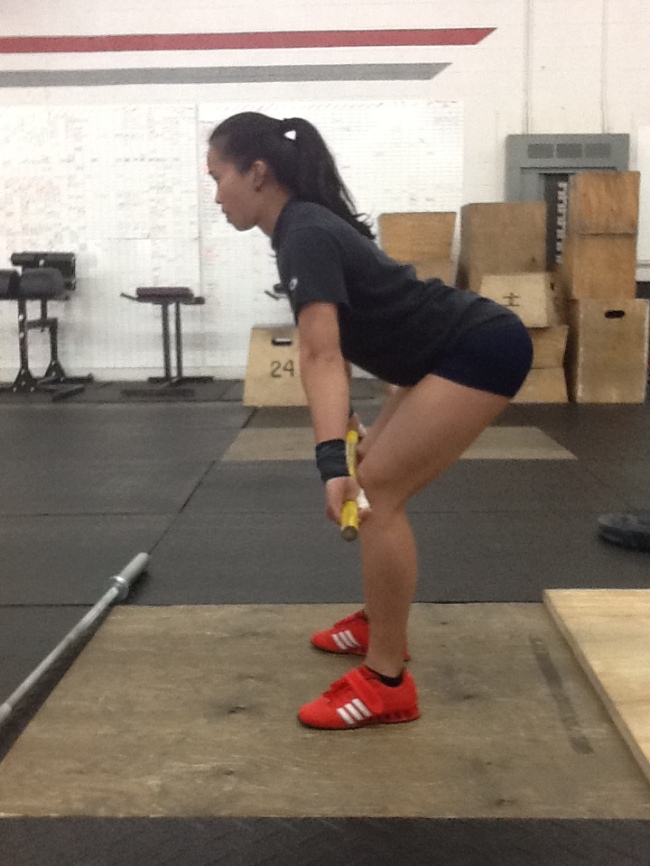
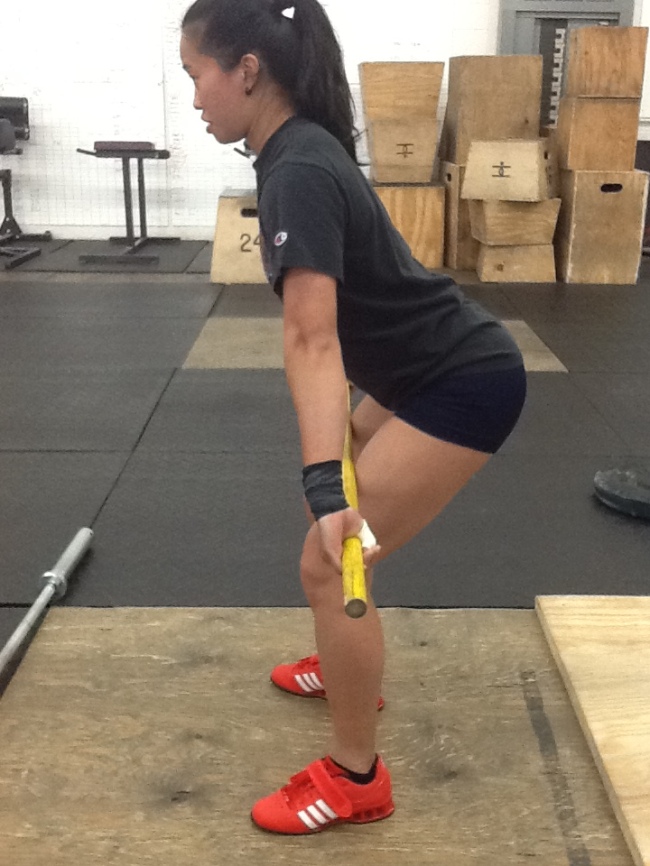
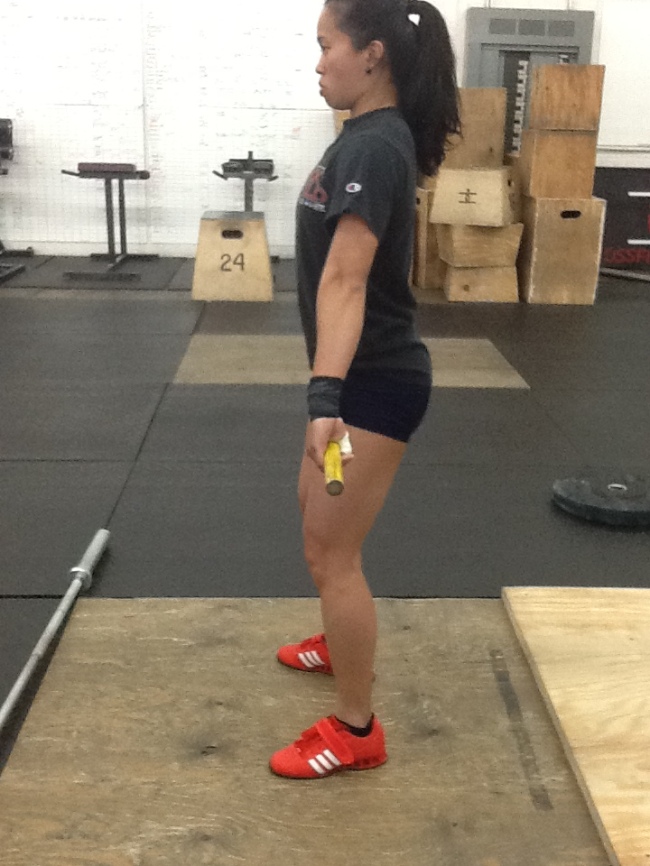
In the photo above, Kat Lee of Rubber City Weightlifting is in the vertical shin position that good lifters strive to hit when sweeping the bar off the floor. The bar is just above her kneecap, her weight shifted slightly to her heels, her shoulders a bit in front of the bar. Draw a line straight down from the end of the bar and notice where it is over her base; it is right over the instep strap, or dead center. Given that the lifter has reached this point on good shape, where we go from here can in large part determine the fate of the lift. If the lifter has learned to finish this pull with the “jump” cue, they will leave their shoulders over the bar and drive their hips forward, up and under the shoulders. The picture below exaggerates this a bit, but for a lot of lifters, not by much.

Image

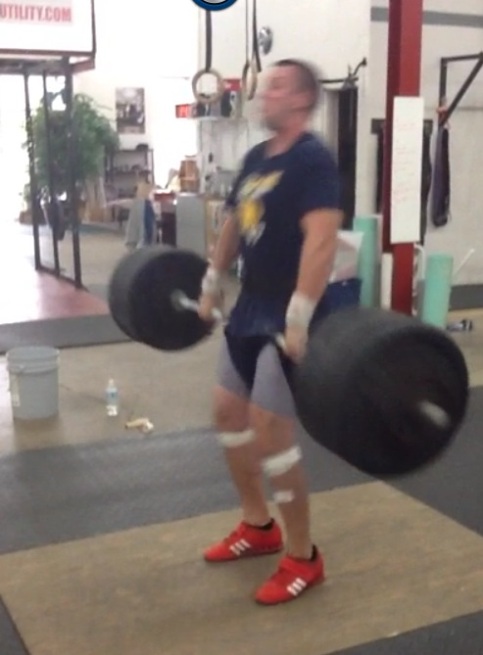
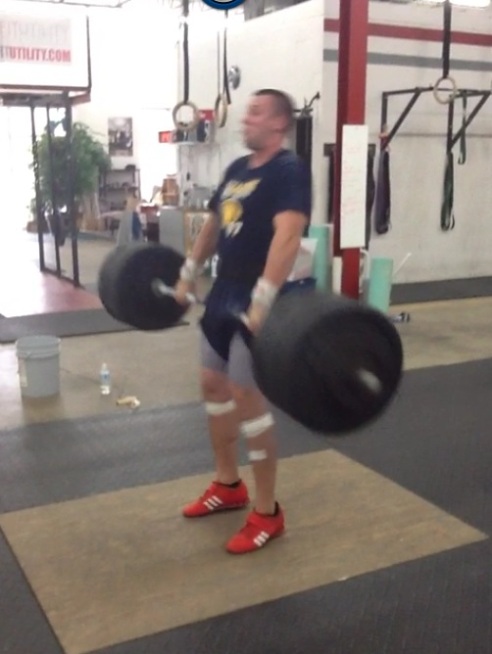
The bar is still over her base, but the position in which she’s left herself, it won’t stay there long. If she’s going to “jump,” she has to get up on the balls of her feet. That means her hips continue to travel forward to get under her shoulders and drive up. The finish, far too often, looks like this:

Image

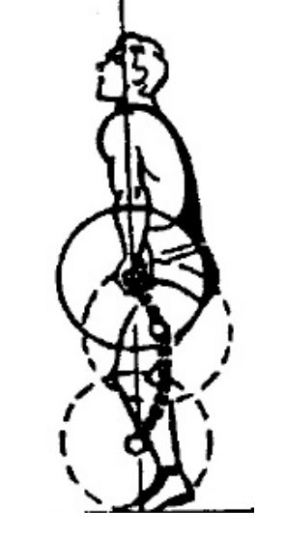
If you jump forward in your lifts, and you check yourself on video frame by frame, you’re going to find some version of this position. Again, draw a line straight down from the end of the bar. For lifters who “jump” the bar will often be out in front of the ball of the foot, or at best over it. Even at that it is too far out front. That was once considered ideal, as this is still found in textbooks sometimes:

Image

There is not a single world class lifter who does this. None. But I still see the illustration below being passed around, part of a series of stills demonstrating “correct” technique. The bar is at mid-thigh, but the shoulders are still over the bar and the heels already off the ground.

Image

If you follow through as this series of pics suggests, You can still extend up and behind the bar as you should, but even in this instructional pic, notice where the bar is–too far away already and moving away from the lifter.

Image

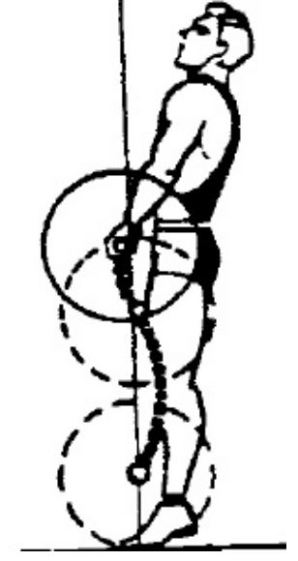
So what should we think if not jump? Stand up. Just stand up. From the bar position just above the kneecap, instead of leaving your shoulders forward and driving your hips forward to the bar, simply stand up and watch the bar come right back to your hips. (Or upper thighs in the clean)

Image

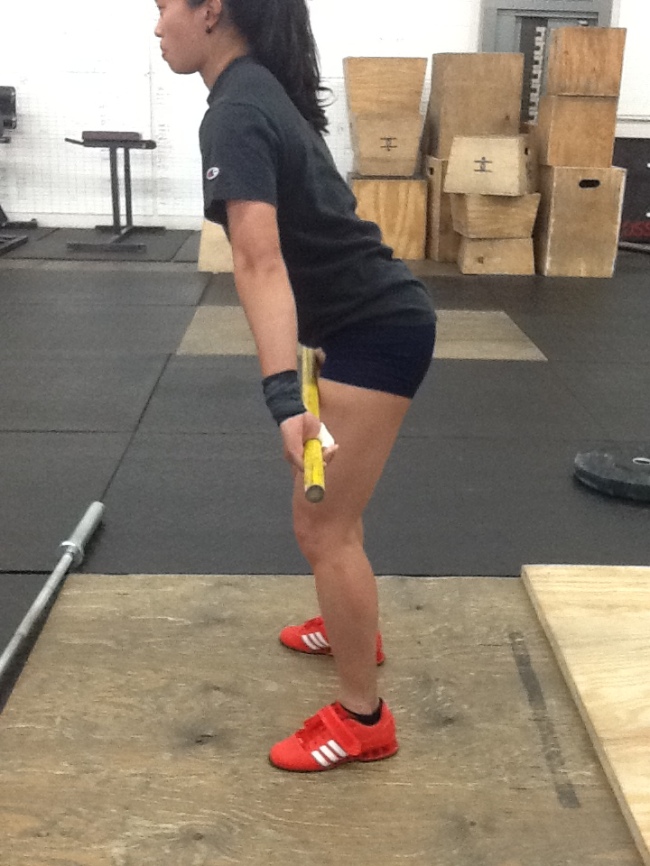
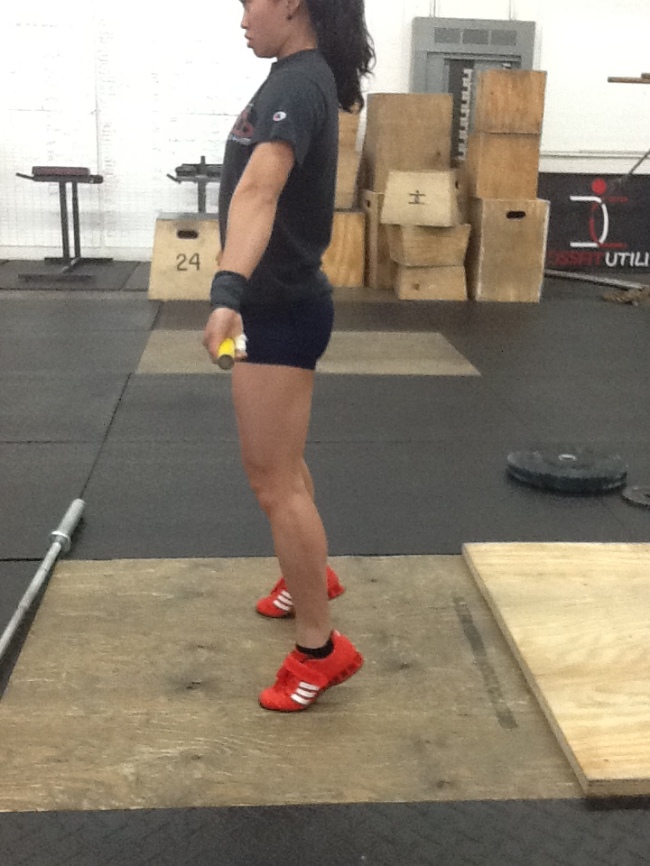
In the photo above, Kat is beginning to raise her torso, thinking “stand up” rather than jump. The bar continues to track backward, deeper over her base, rather than being driven forward. Below she is near the finish of the pull, bar still over her base, her torso nearly vertical over the back half of her foot.

Image

From the above position she’ll extend up and slightly back to finish the pull. Now, I can hear the howls of protest now, “How can you just stand up and get any upward momentum on the bar at all. That’s just a deadlift!” No, it isn’t. It’s just a deadlift if you do it slowly. As you may know, we don’t do an Olympic lift slow.

If you’ve been in the sport for a even a little while, you’ve no doubt heard of the double-knee-bend. The knees extend in the first pull, then as the torso extends in the second pull, the knees flex again, pushing forward under the bar. This is supposed to happen automatically, and it does if you focus on extending the torso. The two strongest muscles in the hamstring group cross both the hip, where their job is to extend the hip, and the knee, where they act to flex the knee. With the bar just above the knee at the end of the first pull, the hamstrings are stretched near to busting and ready to fire. When you attempt to rapidly extend the torso–that is, stand up–the hamstrings flex hard to extend the hip. But they are also flexing the knee and, if you do it right, you end up here:

Image

and very shortly thereafter, here:

Image

The double knee bend happens automatically; so too, I believe, the initial drive upward from the quads. That upward drive can and should be emphasized. How? Think stand up, punch up. Or punch hips up. Or punch feet down. Anything that gets you driving your hips up with your legs.

Pulling this way keeps the double knee bend short and sharp. It puts you just a little out of balance backwards and forces you to withdraw your hips before they can drive too far forward. You’ll end up jumping backward and inch or two at most.

So the lesson is this: Do not jump up. Stand up. Then pull down. Stand-up, pull-down. If you can get yourself doing that, the rest is cleaning up details.

Don’t Be a Slacker

Image

Mark Cameron, still the lightest American ever to Clean & Jerk over 500 pounds (227.5 kilos to be exact) told me something over breakfast at Nationals a few years ago that I have never forgotten. “The lift doesn’t start when the bar comes off the floor.” From the moment your hands touch the bar to the instant it breaks from the floor you are engaged in a deliberate process. It may be quick, but it is not sudden.

The process involves going from having none of the weight of the barbell in your hands to all of it as it comes off the floor. The beginning of this is what I call “taking out the slack.” If you pull on any bar loaded with plates, even very expensive and well made bars and plates, you will hear an audible metallic click. That’s the sound of the bar closing the gap between the sleeve and the metal liner of the hole in the plate. You have begun taking the weight in your hands by lifting just the bar. (If you hear that click just as the bar breaks from the floor, you are probably jerking it off the floor and threatening to lose all-important position) The next step is to start tightening your back against the pressure in your hands. If you start with your hips high, you’ll drop your hips, lift your chest and begin arching your back. This will pull more of the weight of the bar in your hands and, if you get your hips as low as they should be, the increasing load will transfer to your legs and put pressure in your feet.

It works more or less the same way if you start with your hips low and back loose, pushing up to get the slack out, then arching your back to take more weight in your hands. In either case, you should look like this just before the bar breaks from the floor.

Image

The important thing to notice about “taking out the slack” is that you are using the weight of the bar to work against while tightening your back. If you simply arch your back against no resistance–no weight in your hands to pull against–your back will not be adequately prepared to hold position when the bar breaks from the floor. Most lifter’s backs will give at least a little as the entire load comes suddenly into their hands and back. That will cause the bar to move straight up or even away from the lifter as it leaves the floor, rather than moving back toward the lifter as it should.

Too many lifters rip the bar off the floor without this deliberate process of preparing the back to transfer the load to the legs and feet. We are taking what is essentially the most flexible part of our frame–the spine–and by properly “taking out the slack” making it into a rigid conduit through which the load in our hands is conveyed to our legs and feet.

You can’t be lazy or sloppy about the process of getting the weight off the floor. If you are it will get back to the floor a lot sooner than you’d like. Maybe your back won’t look like this when you tighten it against the bar, but you should at least have this kind of effort in mind.

Image

Don’t be a slacker; take out the slack.

(I hope Rob Macklem will not mind the use of his photos for this. He’s one of the best weightlifting photographers out there.)

How Do WE Do it?


There has been debate for decades in this country about the best systems to develop and produce world class weightlifters. We’ve had clubs and our training hall at the Olympic Training Center model their training on the old Soviet system, the Bulgarian system that defeated them, and the Chinese system that surpassed the Bulgarians. We’ve looked at second tier systems modeled on those three in the Greeks, the Germans, the South Koreans, Cuba and all the little –stan countries and South American countries that rose to success followed the breakup of the Soviet Union. They all have similar elements that we are always advised to implement: get athletes while they are young; test for those with the highest potential; institute a system of ranking and rewards; better educate our coaches; get better drugs. (Just kidding on that last one USADA) But we lack most of the things that make that advice usable. We cannot “get ‘em young” because more popular sports take the cream of the athletic crop year after year. There’s no point in screening for the best potential because football or baseball or soccer got them when they were five. We can develop a system of ranking, but it cannot compare to the scholastic/college/pro system that develops athletes from pee-wee to junior high to high school to college to the professional ranks. We can’t reward developmental steps because our broke-ass sport can barely pay for what we have now, let alone expand upon that.

Little of the foregoing advice given is helpful because it all looks outside of our own society for models instead of looking at what we have and what we can do with that. We rarely get a ten-year-old who will stay in the sport long enough for development. What we get are college kids who are done with high school football or softball. We get the guy who couldn’t go on to college football because of a knee injury. We get the late-blooming athlete who didn’t develop soon enough to get into tough high school or college sports programs. We get former cheerleaders who discover strength sports after high school. Lately we’re getting athletes who have been exposed to the Olympic lifts for the first time through CrossFit and decided they liked moving heavy stuff more than breathing really hard and puking. So since this is what we get, why aren’t we asking how to succeed with them, rather than waiting for our Soviet or Bulgarian or Chinese Model fantasies to come true? What do the athletes we actually get need to become high level competitors?

They need to learn technique and they need to learn it fast. We have to find a way to instill proficiency in the lifts as quickly as possible. The drills and teaching methods used to teach ten-year-olds who have years to master technique are inadequate. One of our more senior coaches once told me it takes five years to learn the lifts. A twenty-year-old athlete does not have five years to waste. Nor do we have the luxury of dismissing such an athlete and staring wistfully at the horizon waiting for the freakish child athlete of our dreams. We need to find drills and teaching methods that work quickly early on. Two that I’ve found very useful are what I call the “back half” drill (what Don McCauley calls the “over the edge” drill) that teaches a lifter how to use their hips properly and in the right timing. I experiment with it to see how much weight can be used and if that improves the hip movement or not. Another drill I just started using, after a long conversation with Glenn Pendlay, uses light bands on the bar to force the lifter to aggressively pull down to the bar. Glenn has used it successfully in the snatch, but I’m using it on the clean first, until I have a better idea how to utilize it. Initial results are very encouraging. Lifters slow to move under the bar learn in a few reps what they have to do. Glenn told me that he has saved months of teaching with 20 minutes on this drill. From what I saw last night, he is right. That is the sort of innovative thinking and experimentation required for us to work within the limits or our own culture and succeed.

They need to address mobility issues early and often. CrossFit has led the way in this regard. CrossFit gets so many former athletes with old injuries and middle-aged people who were never athletes. Many of them have mobility problems with shoulders, hips, ankles and wrists. Rather than ignore these problems and limit their members, they have tapped the knowledge of innovative PTs like Kelly Starrett at mobilitywod.com. Turns out that big changes in mobility can happen far faster than coaches had thought. That means you don’t have to give up on fine athletes in their late teens or twenties because they can’t get into a decent overhead squat or front squat position. We can fix most of them if we take the time to learn.

They need to push hard. We need coaches to experiment with great volume at heavy weights and cheap, easily accessible methods that speed recovery. Again, Glenn Pendlay leads the way here, pushing his guys hard and daily. He’s found ways to let his lifters attack heavy weights often but still get in quality reps that reinforce good technique. We have to have both and as early in a new lifter’s career as we can. Again, we will get very few young and talented lifters to mold as the Chinese or Russians do. We need to make lifters our way, with the lifters we get. But we won’t find the way that works for us unless we do something different from the programs we cannot emulate.

They need a support structure to keep training. But we do not have and will not have an organized and hierarchical system that finds local kids, teaches them the lifts early, and funnels talent upward to more advanced training at regional and national training centers. We don’t have the money or the will to establish such a system and pay the coaches who make it work. So trying to do what the Chinese do or the Soviets did is a pipe dream. What we have is a group of widely scattered coaches and clubs who have varying degrees of success at finding and developing talent. We do have some models that work on some scale: a couple colleges that offer scholarships for weightlifting; a supported (kinda) national training center; some corporate sponsored clubs who have had success keeping lifters in the game (MDUSA) and some big clubs who do a good job raising money for their lifters (Coffee’s Gym, East Coast Gold). This crazy quilt “organization” is about the best we’re going to do. What’s the key to this “system?” Volunteer coaches who push to create clubs, raise money and try to become professional about it. They need guidance in the form of information, learning opportunities to increase their skills, and some path to making a living as a coach. If they can make a living at it, they can devote more time to seeing if we can make all of forgoing actually work. Here, again, is where CrossFit comes in. Thanks to CrossFit introducing vast numbers of people to the Olympic lifts (as well as basic barbell exercises like the back squat) we weightlifting coaches have been given a two-fold opportunity: make a living and see thousands of lifts to sharpen our coaching eyes.

But all of this only matters if we convince ourselves that it can be done here and develop the determination to find a way. Our way.

Yeah, You Should Deadlift

You don’t have to spend much time in the sport of weightlifting before you understand in your bones the importance of squatting to your success as a weightlifter. In every training hall you’ll hear discussions of programs and impressive back squat weights, on weightlifting message boards every conceivable permutation of squatting programs are dissected and argued. There are nearly as many youtube videos of world class lifters back squatting as there are of them doing the lifts. The message is clear: squat or suck. What I almost never hear is anyone (besides Don McCauley) mention the importance of the deadlift to successful weightlifting.

For some reason the deadlift gets short shrift in weightlifting. Coaches and lifters are always trying to substitute pulls in their programs and refer to them as “strength building” exercises. Bullshit. Pulls–the bastard hybrid of deadlifts and weightlifting’s full lifts–have been rightly rejected by a lot of good coaches because they do not duplicate the speed and technique of a classic lift, but are not heavy enough to really improve back strength or, to a lesser degree, hamstring strength.

“But won’t heavy deadlifts make my pull slow?” No. Hell no. Did you ever see anyone fly out of the hole with a new PR single in the back squat? Did anyone ever say that squatting that heavy makes a lifter slow? No, because we’d all look at that person as if they were the dumbest person in the room. Back squats make you STRONG and strong matters in weightlifting.

Deadlifts make you STRONG, but they also do a few other good things for you. Early in a lifter’s career, deadlifts teach proprioceptive awareness of the “locked down” back position so important to the classic lifts. The spinal erectors, lats, all the small muscles around the shoulder blades and the core have to be properly contracted and held in that position throughout the pull. The lifter has to feel that to hold it. Deadlifting with precise form teaches the lifter to feel that position and, more important, hold it while moving. Early on I never have a lifter do deadlifts with more weight than they can hold perfectly for a triple.  As holding that position becomes ingrained habit, the weights can start to go up.

Deadlifting as heavy–as heavy as good back position and technique allows–also teaches lifters how to strain. Someone new to lifting does not know the limits of their body. The mind says “heavy” at far lighter weights than the body can actually handle with decent form. Deadlifts teach a new lifter to strain against a weight and stay with it better than any exercise I’ve used.

I can hear the protests now. “But heavy deadlifts will mess up the technique of the classic lifts!” I didn’t say powerlifting deadlifts, did I. Deadlifts for weightlifters should all be done with exactly the same form as a pull, but heavier and necessarily slower. Above the knees the lifter should simply stand up over his or her heels, attempting to push the hips as high as they can. I have a couple lifters who even “pop” their hips up at the end.

How heavy is heavy for deadlifts? I don’t see a reason to go over 125% of a lifter’s best clean for much of the year. My more experienced lifters are usually working between 105% and 120% for triples. They do this once a week and alternate clean and snatch deadlifts, one week CDLs and the next SDLs. If it’s far out from a meet and the classic lift volume is not high, they can go for a big single or double.

I had a 94 kilo lifter visit a few months back who could pound out sets of five with 225kg in the back squat, but his back gave off the floor attempting a 125 snatch and 165 clean. I had him start deadlifting to teach him how to better hold back position off the floor and make his back stronger. His back position quickly improved and he just recently hit a PR 131 snatch and PR 172 clean. He always had the leg strength to do those lifts, but lacked the back strength and proprioceptive awareness of his back position to hit them.

Deadlifts will not make you slow. They will make you strong. And as grandpa used to say, “It’s good to be strong.”


Light Day?

In an effort to break out of my apparent rut of unoriginal and derivative thinking (according to, I’m certain, a well-intentioned critic) may I propose that the traditional light day/back-off day be completely discarded as a training concept. We might even have to rethink the efficacy of the unloading week in the traditional four-week mesocycle.

So, what, you ask should we do instead? Just go all Bulgarian max-out every workout, every week, all year, until our joints swell and spontaneously disassemble in one spectacular PR effort? No. What I’m thinking is a change in perspective rather than training strategy.

In my experience, “light days” are taken exactly that way, that is lightly. Athletes put in less effort, sometimes don’t show up at all, treating them as optional, or think of the day as a kind of active rest. It is true that their function is to unload the athlete but still give them work in the motor patterns they need to keep “grooved in,” so it is a form of rest. It’s the word “light” that bothers me, and all that it implies. So let’s start calling it a “speed day” instead of a light day.

Rather than emphasizing the qualities of strength and consistency at heavy weight (still trying to move the weight as fast as you can) on a speed day we concentrate on moving lighter weight even faster, focusing on the speed and precision of the movement. At these lighter weights a lifter can address the nuances of technique at speed.

This idea of a “speed day” can be expanded to a “speed and technique week” in the traditional four-week training block often called a mesocycle. The load is still reduced, but the focus of the athlete is maintained and the emphasis shifted to fast and precise technique.

The time for a truly light week, even time off or active rest, is just after the biggest meet of the year. Otherwise the “light week” is the time to get fast, precise and faster yet.